
Friday, January 29, 2010
The Case for Kits-I have to follow the instructions?

I'm famous for my inability to follow a map, a set of video equipment instructions, or God help me, a cook book. I'm truly dyslexic, but that's really only a good excuse. The other factor is that I'm a pig on ice. A pig on ice is a stubborn creature who may be in big trouble but is very unlikely to accept your help. It's just going to do what it does.
So, burdened as I am with those difficulties, I'm very unlikely to get a kit to make anything. It comes with instructions, and I'm more likely to line the cat pan with those rather than read them.
So, why did I say I'd make kits? Because my limits are not anyone else's and if it helps launch them, then let's do it.
Around 5 years ago, I began to see a difference in the quilters in my class. Quilters are to the main, brilliant, able and intellegent. They're a pleasure to teach. And Why NOT! They're women past the age of a great deal of personal vanity and silliness. And with vast experiences.
But the new students are, though just as brilliant, and able, new to sewing. They measure their experience in months, not years. For some of them, you're looking at their first machine and they bought it 2 months ago.
Are they less able? Less worthy? Good God no!
But they do need a leg up.
I took my education in primary and specialized in first grade. I do not believe in the bell curve. In the same way I was unwilling to have one student who couldn't tie their shoes (think about this. If they can't tie it, who will have to?), I refuse to have a student who can't start where she is, and learn what she can. And to the main, I see them shoot past us older girls, because they don't know the limits that really don't count now. I'm honored when they come to my class and I stand back when they get going. I know its going to happen like a rocket taking off, and I'd rather not get run down.
So when is a kit not a compromise?
When it's a point to jump off from. Often the hard point for someone starting is the whole design process.It's my favorite thing to teach. I've watched so many people go from their fear to their fervor. The passion that is unleashed as we start to play with our own images is a holy thing and a thing that makes us whole. But not every one can do that on command on a Saturday afternoon in a six hour class.
One of my favorite art facts is that Degas traced a particular pastel and colored it different ways, over and over and over on tracing paper. Someone was actually smart enough to preserve them. He'd taken one part (the color choices) of his creation and made an exercise of try dozens of different colors in different ways. Creative? Maybe not. Good learning, well, Brilliant! He limited the choices he was making to focus on learning new skill. And that, is what we can do with kits.
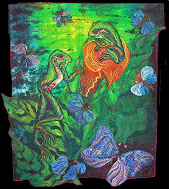
So in the same way, I've done 10 kits for Cotton Club that range from ladybugs, butterflies, pansies, roses, luna moths, fish, frogs, leaves and black eyed susans. There's a full color wheel of hand-dyed threads with others chosen to make your project simple. By taking some choices off the table, we can focus and really learn one thing well.
But, for the other pigs on ice, and I know you're out there.
Use it:
- To build your stash
- To try colors you don't often try
- To work with different bobbin work styles
- To stretch your color knowledge and your stitching skills.
You'll find these kits at
The Cotton Club
You'll find a slide show of them on my blog at
Thread Magic Events
Thread Savy-Why dye! The Case for Hand-dyed Thread

Variegated thread is sort of a mixed blessing in almost all the commercial threads. There are two basic types. There are threads variagated through rainbow colors. These make great stippling threads. The color changes carry your eye across the surface and they're very interesting for that. But they're miserable to shade with. Who, over the age of three, wants a random rainbow colored anything? It's a serious limit.
They also come with small variegations, that range around one color. Again, it's a limited effect. Finally you'll find pearl cottons that range in value from white to the darkest tone of the color. This works for flowers, but for anything else, it looks like it fades in and out. These threads were never made to shade solid images.

The threads I dye are #5 Pearl cottons. They're made from mercerized cotton and dye beautifully! And they're already washed out and needle ready( I wash out all my red threads an extra time, just to insure their color fastness). Slightly larger than the #8 metallics, they are a perfect thread for bobbin weight work.


Ellen Anne Eddy's Hand-Dyed Thread Club can checked out at The Cotton Club. These cute little kits can start you out with threads that will do the hard color choices for you.
You can see these kits at the Cotton Club or on my blog at
Thread Magic Events
Thread Savy-Why dye! The Case for Hand-dyed Thread
Variegated thread is sort of a mixed blessing in almost all the commercial threads. There are two basic types. There are threads variagated through rainbow colors. These make great stippling threads. The color changes carry your eye across the surface and they're very interesting for that. But they're miserable to shade with. Who, over the age of three, wants a random rainbow colored anything? It's a serious limit.
They also come with small variegations, that range around one color. Again, it's a limited effect. Finally you'll find pearl cottons that range in value from white to the darkest tone of the color. This works for flowers, but for anything else, it looks like it fades in and out. These threads were never made to shade solid images.
The threads I dye are #5 Pearl cottons. They're made from mercerized cotton and dye beautifully! And they're already washed out and needle ready( I wash out all my red threads an extra time, just to insure their color fastness). Slightly larger than the #8 metallics, they are a perfect thread for bobbin weight work.
Ellen Anne Eddy's Hand-Dyed Thread Club can checked out at The Cotton Club. These cute little kits can start you out with threads that will do the hard color choices for you.
You can see these kits at the Cotton Club or on my blog at
Thread Magic Events
Friday, January 22, 2010
Thread Savy- Thick Metallic Threads

The metallic thick threads are especially yummy. Because they're thick, they build up an image very quickly. And being metallic, shiny and gorgeous doesn't hurt either.
What's the catch? Well, it helps if you're dyslexic. Because these threads are sewed upside down.
There are three basic brands. Madeira Glamor, YLI Candlelight and Superior Razzle Dazzle are all identical in form and function, but the differing companies offer different colors. They work in an either adjusted or bypassed bobbing case (ask your mechanic and he'll help set that up. And you sew upside down. Use a matching polyester #40 thread through the needle. The thicker thread will look like it's been couched on. It's a very pretty look.
Is that hard? Of course not. Can you look through a slide backward? I use my drawing on stabilizer in the back and fill it in with simple straight stitch repetitive shapes. Or I've drawn on the quilt sandwich from the back and stitched along that.
The dandelion puff here is YLI Rainbow Candlelight.
Wrapping it up
Thick metallic threads work beautifully in a bypassed or adjusted bobbin case. Stitching with a straight stitch you can make wonderful filled in images or lacy textures, at your choice.
Thread Savy- Thick Metallic Threads
The metallic thick threads are especially yummy. Because they're thick, they build up an image very quickly. And being metallic, shiny and gorgeous doesn't hurt either.
What's the catch? Well, it helps if you're dyslexic. Because these threads are sewed upside down.
There are three basic brands. Madeira Glamor, YLI Candlelight and Superior Razzle Dazzle are all identical in form and function, but the differing companies offer different colors. They work in an either adjusted or bypassed bobbing case (ask your mechanic and he'll help set that up. And you sew upside down. Use a matching polyester #40 thread through the needle. The thicker thread will look like it's been couched on. It's a very pretty look.
Is that hard? Of course not. Can you look through a slide backward? I use my drawing on stabilizer in the back and fill it in with simple straight stitch repetitive shapes. Or I've drawn on the quilt sandwich from the back and stitched along that.
The dandelion puff here is YLI Rainbow Candlelight.
Wrapping it up
Thick metallic threads work beautifully in a bypassed or adjusted bobbin case. Stitching with a straight stitch you can make wonderful filled in images or lacy textures, at your choice.
Tuesday, January 19, 2010
Musings: Art Outside the Box. Your Authentic Voice

Perhaps we're always still looking for our voice. One of the reasons I treasure the art/ quilt movement so much is that in many ways it's really been the first art form made almost exclusively of women past their childbearing years. Art/quilting couldn't have happened a hundred years ago. Women didn't live long enough to have the passion and drive left to truly find their voice and then the energy to say what they needed to say. Anatomy as destiny was a cruel road. It's not that long ago. Suddenly there's a groundswell of women who found a space in time to say something and a different way to say it.
I don't mean to dismiss male quilters. There are many fine ones, but men have always had stronger communication skills and more built in confidence and entitlement about how they use them. One is rarely left asking what they thought. They'll tell you. They're good at that.
As women, we've had to fight for that voice. We've had to redefine what we do as art. We've had to build places to show it, tools to create it, new palettes of thread and cloth to work with. Almost all of this has been a grass roots thing, something sprung out of small groups at home. Until someone with a business degree noticed that quilters spend money, and it became a business.
But in the middle of that, thousands of women have found a new way to say the unspoken, the unheard of, the heart's whisper, the moan of fear and pain, the laughter of raucous joy, all of that has bled its way into our art, through our quilts.
I think there's two parts to voice. The first part is the technical skill. There's a vocabulary in our skills that is the building block of what we say in our work. As long as you're working primarily with someone else's blocks, I think that voice isn't truly yours.
But then there's vision. That's truly unique. I'm always a bit wistful about the quilt fashions each year. There'll be a run on one subject or another. Someone will bring out a new book that touts a particular technique and you see it everywhere. I find that sad because under it, I know that I haven't truly heard that woman's voice.She's working on technique or on eye candy, all good exercises on the way, but not her true voice.She's coming. Her voice is in the wind, on the way.
How many of us really have that courage anyway? To pull out the bits of our lives for display and to shout them into existence in cloth.
My voice is not safe. Its not quiet. It's not even safe for me. As I speak my heart, my heart is out in public, beating, bleeding, bearing examination, bearing judgement. And yet, what else can I do? What else is art for?
Sunday, January 17, 2010
Thread Savy-Metallic Threads

Not so with metallics.Most people report they have trouble sewing with metallic thread. It's also always harder free motion. Why?
It's All in How It's Made
Metallic threads are usually a combination of lurex, viscose(rayon), polyester, and whatever else was in the test tube. They're usually wound together in the process. Of course, whatever is wound can be unwound. So it makes sense that under the stress of sewing, these threads are much more likely to break.
There are three basic forms of metallic thread

These threads are twisted with the components all together. They have an appearance of flecked sparkles.These tend to be the strongest of the metallic threads. My favorite flecked threads are the Madeira Supertwists.These threads work either in needle or bobbin, zigzag or straight.

This thread has a poly or rayon core with lurex or metal wrapped around it.These threads vary a lot, depending on what the core is, and whether the wrapping is glued on or not. My favorite wound thread are Superior Metallic, and Yenmet, which have a poly core and are glued supposedly with rice paste. These threads work either in needle or bobbin, zigzag or straight.

These threads look like Christmas tinsel. They're flat and nothing but lurex. They're notoriously breakable.
But they are lovely. I use them in the bobbin only.
The Three Best Tricks
Here are the three best tricks for making metallic thread work better.
The Bobbin vs the Needle
Every thread that goes through your needle goes through it 50 times. That's a lot of wear and tear. If it goes through your bobbin it gets picked up just once. So if your thread is breaking, sew with it in the bobbin with a poly or rayon thread that matches it in color on top. Much less breakage.
The Right Needle
The best needle for all free motion embroidery is usually a #90 topstitching needle. The bigger eye and shart point make a huge difference. See my entry, The Needle Knows.
Sewers Aid
This silicon thread treatment makes threads infinitely stronger. You can use it on threads that need some help. Just drool it along the spool.
And as always
Garbage in, Garbage out
Nothing fixes either cheap or old thread. If it won't sew you can always glob with it. I'll show you that trick another time.
Wrapping it up
Metallic threads are a beautiful addition to your thread pallet. With special care and tricks they add all the glitz a girl can use.
Subscribe to:
Comments (Atom)
Review of Thread Magic Garden

From the Subversive Stitch
Review of Thread Magic Garden

Book Review from Golden Dog Quilting
C&T Blog

My Studio Garden: A blog at C&T Publishing
Like us on Facebook

Quiltposium, Fall2011

Ellen's New Article, Dance of Design
Essential Embroidery Stitches: Free Hand and Machine Embroidery Designs and Techniques.

Get this free book from Quilting Arts. It has a series of articles I wrote called Defining the Line.
The Butterfly Effect

My Blog List
-
22 hours ago
-
5 days ago
-
2 months ago
-
3 months ago
-
6 months ago
-
2 years ago
-
5 years ago
-
5 years ago
-
5 years ago
-
7 years ago
-
7 years ago
-
8 years ago
-
9 years ago
-
9 years ago
-
9 years ago
-
9 years ago
-
10 years ago
-
10 years ago
-
11 years ago
-
11 years ago
-
11 years ago
-
11 years ago
-
12 years ago
-
12 years ago
-
12 years ago
-
12 years ago
-
13 years ago
-
13 years ago
-
13 years ago
-
13 years ago
-
13 years ago
-
13 years ago
-
13 years ago
-
13 years ago
-
14 years ago
-
-
-
Guest Blog On Subversive Stitchers!
The Stories Tell Me

Facebook Badge

Guest Blog On Quilt Gallery
http://quiltinggallery.com/2010/08/12/dancing-in-the-light/
